Sunday, August 30, 2020

Keyboard problem or if Keyboard is not working on your laptop


Sometime if all other things are okey then we have to try with these following things to trobleshoot what exactly happed to the keyboard.

Method 1: Re-power your laptop

If somehow your Toshiba/Dell/ Acer or any laptop keyboard gets stuck, the keys could stop working. Follow these steps to re-power your laptop:

  1. Shut down your laptop completely.

  2. Remove your laptop’s battery and unplug your laptop’s power cable

  3. Press and hold down the power button of your laptop for around 60 seconds.

  4. Put the battery back to your laptop and then turn on your laptop as usual.

Try to type using your laptop’s keyboard and check to see if those keys stop working before could work well.

Method 2: Update your keyboard driver and HID driver

An old, corrupted or missing keyboard driver or HID (Human interface device) driver could also caused your  laptop keys, especially your Fn keys, not to working. So we recommend updating your keyboard and HID drivers.

You can get the correct device drivers either manually or automatically.

Manual driver update – You can update your keyboard and HID drivers manually by going to the official Toshiba website, and searching for the most recent correct driver. Be sure to choose only drivers that are compatible with your Windows system type.

Automatic driver update – If you don’t have the time, patience or computer skills to update your keyboard and HID drivers manually, you can, instead, do it automatically with Driver Easy. Driver Easy will automatically recognize your system and find the correct drivers for your devices, and your Windows version, and it will download and install them correctly:

  1. Download and install Driver Easy.

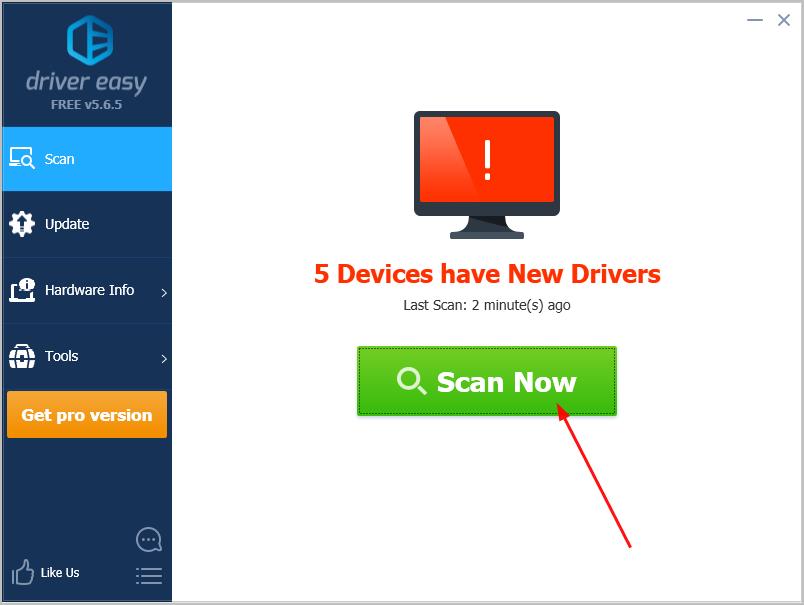
  2. Run Driver Easy and click the Scan Now button. Driver Easy will then scan your computer and detect any problem drivers.

  3. Click Update next to the flagged keyboard or HID driver to automatically download the correct version of that driver, then you can manually install it (you can do this with the FREE version).

    Or click Update All to automatically download and install the correct version of all the drivers that are missing or out of date on your system. (This requires the Pro version which comes with full support and a 30-day money back guarantee. You’ll be prompted to upgrade when you click Update All.)

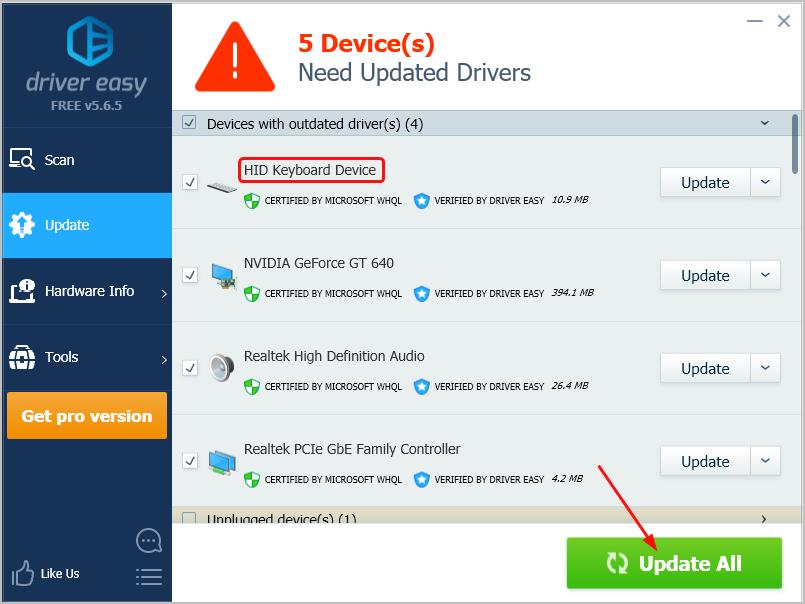
After updating the drivers, try to type using your laptop’s keyboard and check to see if those keys stop working before could work well.

Method 3: Clean your keyboard with a compressed air duster

If your laptop keys are stuck with some lint or dust, the keys may also stop working. If this is the case, you can clean your keyboard with a compressed air duster to solve your problem.

If you don’t have a compressed air duster on hand, simply by one on Amazon.

Tuesday, June 16, 2020

Removing Windows Defender Security for apps to install from outside windows app store

Check security settings

  • Log into Windows as administrator
  • Click Start and choose Settings.
  • Click on Update & Security.

Videos not playing on Windows 10

  • Go the last option on the left For developers and check the settings there. You may have Windows Store apps selected.

  • Change it to Sideload apps

Learn everything there is to know about the administrator account and how you can enable/disable it right here!


How to enable the Administrator account in Windows 10:

  1. Open the “Power Users” menu by pressing “ Win + X” shortcut keys (in the same time) from the keyboard;
  2. Drag your mouse pointer over the “Command Prompt (Admin)” feature;
  3. Left click on it and you can observe that the cmd.exe will open;
  4. Type the following command: “net user administrator /active: yes”, but without quotes;
  5. You need to sign out from the current user account;
  6. Observe that an “Administrator” account showed up on the log on screen.

How to disable the Administrator account in Windows 10:

  1. Open the “Power Users” menu by pressing “Win + X” shortcut keys (in the same time) from the keyboard;
  2. Drag your mouse pointer over the “Command Prompt (Admin)” feature;
  3. Left click on it and you can observe that the cmd.exe will open;
  4. Type the following command: “net user administrator /active: no”, but without quotes;
  5. The Administrator account will be disabled again.

Well, I hope that the method described above will help you to enable or disable the admin account in Windows 10. Feel free to leave a comment below.

3. Use Windows 10’s Fix It tool

This helps automatically repair issues like corrupted registry keys that may block you from installing anything on Windows 10. To do this:

  • Click Download to get the fix it tool
  • In File Download box, click Run or Open and follow the instructions in Program Install and Uninstall Troubleshooter

Note: If you’re not on the computer that has the install issue, save the fix it tool to a flash drive or CD, then run it on that computer.

This fixes corrupted registry keys on 64-bit OS, or those that control update data, issues preventing new program installs or existing programs from complete updates or uninstalls, as well as problems blocking you from uninstalling a program from the Control Panel.

Remove PC Errors
Run a PC Scan with Restoro Repair Tool to find errors causing security problems and slowdowns. After the scan is complete, the repair process will replace damaged files with fresh Windows files and components.

Disclaimer: to remove errors, you need to upgrade to a paid plan.


Saturday, May 30, 2020

नेपालीमा सजिलो सित टाइप गर्ने तरिका


मदन पुरस्कार पुस्तकालयले २००७ २००३-४ ताका नेपाली युनिकोड किबोर्ड लेआउट, रोमनाइज्ड र ट्रेडिसनल सार्वजनिक गर्यो । नेपाली टाइपिङ (ट्रेडिसनल) जान्दै नजान्ने (कहिले नेपाली टाइप नगरेको) मैले, मदन पुरस्कार पुस्तकालयले सार्वजनिक गरेको रोमनाइज्ड नेपाली युनिकोड किबोर्ड लेआउट कम्प्युटरमा राखेर पहिलो पटक कम्प्युटरमा नेपाली भाषामा लेखेँ । यसविचमा कम्प्युटर तथा मोबाइलको लागि धेरै किसिमका नेपाली किबोर्ड लेआउट तथा एप्सहरु आइसकेकाछन्, तर पनि इन्टरनेट प्रयोगकर्ताहरु नेपाली टाइप गर्नुपर्दा अप्ठ्यारो मान्छन् । मलाई धेरैले सोध्ने गरेको प्रश्न भनेको, "फेसबुकमा कसरी नेपाली टाइप गर्ने?" अत: यो ब्लगमा मदन पुरस्कार पुस्तकालय (मपुपु) ले निर्माण गरेको नेपाली युनिकोड किबोर्ड लेआउट बारे चर्चा गर्दैछु।

प्रिती, कान्तिपुर लगायतका 'ट्रु टाइप फन्ट' (ttf) प्रयोग गरेर ट्रेडिसनल लेआउटमा नेपाली टाइप गर्ने प्रयोगकर्ताहरुले, नेपाली ट्रेडिसनल युनिकोड किबोर्ड लेआउट राखेर, इन्टरनेटमा सजिलै सँग नेपालीमा लेख्न सक्छन् । भन्नुको मतलब, तपाईलाई पहिले नै नेपाली टाइपिङ आउँछ भने टाइपिङ गर्ने तरिका उही हुन्छ, उही "ब, क, म, न" कै 'फर्म्याट'मा 'टाइप' गर्नुपर्छ, फरक यत्ति हो कि तपाईले कम्प्युटरमा नेपाली युनिकोड ट्रेडिसनल लेआउट राखेको हुनुपर्छ (सेटिङ मिलाएको हुनुपर्छ) ।

नेपाली ट्रेडिसनलमा टाइप नै नगरेकाहरुलाई मैले सँधै मपुपुकै नेपाली रोमनाइज्ड युनिकोड किबोर्ड लेआउट सिफारिश गर्ने गरेको छु । मैले अनुभव गरेको कुरा के हो भने, अधिकांश नेपाली इन्टरनेट प्रयोगकर्ताहरु नेपालीमा टाइप गर्नुपर्यो भने, कुनै साइट वा एपमा गएर गुगल ट्रान्सलिटेरेट प्रयोग गरेर (वा प्रितीआदि फन्टमा लेखेको युनिकोडमा कन्भर्ट गरेर) नेपाली भाषामा लेख्छन्, अनि त्यसलाई 'कपी' गर्छन्, अनि कहाँ 'पोस्ट' गर्नुपर्ने हो त्यहाँ गएर 'पेस्ट' गर्छन् । मलाई त यो प्रक्रिया सम्झिँदै झन्झटिलो लाग्छ ।

कतिले गुगल ट्रान्सलिटेरेट (गुगल इनपुट) पनि कम्प्युटरमा राखेका हुन्छन्, तर एउटै शब्दको लागि पनि 'अंग्रेजी स्पेलिङ' मिलाउँदै, आफूलाई चाहिएको शब्द छान्दै राख्नुपर्छ, यसो गर्दा कहिलेकाँही त आफूले लेख्न खोजेकै शब्द पनि लेख्न सकिन्न । गुगल इनपुटकै लेआउटमा आधारित भएर नेपाली टाइप सजिलो बनाउन दर्जनौँ साइट र मोबाइल एप बनेकाछन्, तर मपुपुले तयार गरेको लेआउटका अगाडि यी सबै झन्झटिला लाग्छन् ।


नेपाली रोमनाइज्ड युनिकोड लेआउट
रोमनाइज्ड लेआउटमा अंग्रेजी अक्षरहरुको आधारमा नेपाली अक्षरहरु लेखिन्छ । भन्नको मतलब, अंग्रेजीमा बोल्दा उस्तै सुनिने अक्षरहरलाई सिधै देवनागिरीमा नेपाली अक्षरहरुलाई जोडा मिलाइएको छ, जसले गर्दा कुनै पनि नेपाली अक्षर वा शब्द रोमनाइज्ड लेआउटमा सजिलै लेख्न सकिन्छ । तपाईले नेपाली अक्षरको बनोट छुट्याउना साथ रोमनाइज्डमा खरर नेपाली लेख्न सक्नुहुन्छ ।


हामीले 'ka' - 'क', 'kha' - ख, भनेर पढ्ने गरेका छौँ, तर रोमनाइज्ड लेआउटमा 'क' लेख्नलाई 'k' मात्र लेखे पुग्छ भने 'ख' लेख्नलाई ठूलो 'K' ! तर यही कुरा गुगल ट्रान्सलिटेरेसनमा लेख्नुपर्दा 'k' र 'kha' नै लेख्नुपर्छ । तलका केही उदाहरणहरु हेरौँ ।
k - क
K - ख
g - ग
G - घ
, - ङ
c - च
C - छ
j - ज
J - झ
y - ञ
यी त केही उदाहरणहरु मात्र भए, प्राय: उस्तै सुनिने अक्षरको लागि एउटै 'अंग्रेजी' सानो र ठूलो अक्षर प्रयोग गरिन्छ । नेपाली अक्षरको बनोट (साउन्ड) अनुसार अंग्रेजी अक्षरसँग जोडा मिलाइएको कारण, यो किबोर्ड जो कोहीले पनि सजिलै चलाउन सक्छन् ।
k - क
ka - का
ki - कि
kI - की
ku - कु
kU - कू
ke - के
kE - कै
ko - को
kw - कौ
kM - कं
आकार, उकार, इकार आदि लेख्नको लागि पनि नेपाली अक्षरको बनौट अनुसार अंग्रेजीसँग मिल्दोजुल्दो अक्षर टाइप गरेर लेख्न सकिन्छ । बुझ्नुपर्ने कुरा के हो भने, रोमनाइज्ड लेआउटमा, 'स्पेलिङ' लेख्ने होइन । रोमनाइज्ड लेआउटमा नेपाली अक्षरको बनौट अनुसार मिल्दोजुल्दो अंग्रेजी अक्षर टाइप गर्ने हो । यसले गर्दा नेपाली आफूले चाहे जसरी शुद्धसँग लेख्न सकिन्छ । ह्रस्व तथा दीर्घको लागि shift + अक्षर ले काम गर्छ ।

अनि आधि/काटिएको/जोडिएको अक्षर लेख्नको लागि '/' संकेत प्रयोग गरिन्छ ।
js/to - जस्तो
Akarpos/t - आकारपोस्ट
b/lg - ब्लग
केही अक्षरहरु भने किबोर्डमा भेट्न सकिन्न । ती अक्षरहरुको लागि दुईवटा अक्षर जोडेर लेख्नुपर्ने हुन्छ, तर ती अक्षरहरु पनि बनोटको आधारमा लेखिने भएकोले लेख्ने बानी भएपछि एकदमै सजिलो लाग्छ ।
क्ष = क + ् + ष
त्र = त + ् + र
ज्ञ = ज + ् + ञ
त्त = त + ् + त
द्ध = द + ् + ध
श्र = श + ् + र
द्य = द + ् + य

हिजोआज आएका प्राय: सबै अपरेटिङ सिस्टममा (विन्डोज तथा लिनक्सका भर्सनहरु) पहिले नै मपुपु लेआउटमा आधारित नेपाली युनिकोड किबोर्ड समावेश गरिएको छ, प्रयोगकर्ताले कम्प्युटरको भाषा तथा किबोर्ड सेटिङमा गएर नेपाली युनिकोड (ट्रेडिसनल वा रोमनाइज्ड) छान्नु मात्र पर्छ (विन्डोज एक्सपी तथा विन्डोज सेभेनको लागि नेपाली युनिकोड रोमनाइज्ड राख्ने तरिका पहिले नै ब्लगमा उल्लेख गरेको छु)।

मोबाइलका लागि, हाम्रो पात्रोले निर्माण गरेको, नेपाली किबोर्ड देखि गुगलले निर्माण गरेको गुगल किबोर्डसम्ममा मपुपुको लेआउटमा आधारित नेपाली युनिकोड रोमनाइज्ड र ट्रेडिसनल किबोर्ड समावेश गरिएको छ ।

मोबाइलका लागि बनाइएका किबोर्डहरुमा पनि मपुपुले विकसित गरेको रोमनाइज्ड किबोर्ड लेआउट समावेश गरिएका कारण, कम्प्युटर होस् वा मोबाइल सबैतिर एकै किसिमले लेख्न सकिन्छ ।

गुगल किबोर्ड

हाम्रो किबोर्ड
Or any other Nepali Keboard 
नेपाली रोमनाइज्ड युनिकोड किबोर्ड लेआउट राख्नुस्, खरर नेपाली टाइप गर्नुस् । तपाईको कम्प्युटरमा पहिले नै रोमनाइज्ड लेआउट (भाषा तथा सेटिङमा गएर किबोर्ड हेर्नुस्) समावेश छैन भने मपुपुको साइटबाट डाउनलोड गरेर इन्स्टल गर्नसक्नुहुन्छ ।

Saturday, November 19, 2016

How to disable USB devices using Group Policy

How to disable USB devices using Group Policy In this post we will see the steps on how to disable USB devices using group policy. In today’s world almost everyone owns one or more USB devices, USB (universal serial bus) connections are typically used to plug devices such as mice, keyboards, scanners, printers, webcams, digital cameras, mobile phones, and external hard disks into your computer. One of the reason for popularity of the USB devices is they are easiest devices that can be connected to your computer. The first time you connect a device that plugs into a USB port, Windows automatically identifies the device and installs a driver for that device. Since USB devices are portable and can be connected easily to the computers these devices pose very real security threats. Some organizations do not allow USB devices to be connected to the computers, they disable the USB devices using group policy or block it using group policy. We will now look at the steps on how to disable USB devices using group policy.

How to disable USB devices using Group Policy

In this post we have a domain controller running on Windows Server 2012 R2 Datacenter edition and a client that is a part of domain running Windows 7 Professional SP1 edition. The group policy to disable USB devices will be created on domain controller and we will be applying it on a OU containing the computer account WIN7.
How to disable USB devices using Group Policy
Launch the Group Policy Management tool on the domain controller, right click Group Policy Objects, click New. Provide a name to the GPO and click OK. In this example I have named the group policy as Block USB Devices.
How to disable USB devices using Group Policy
Right click the policy and click Edit.  This will open Group Policy Management Editor. Navigate to Computer Configuration\Policies\Administrative Templates\System\Removable Storage Access. This is the place where you find settings for Removable Storage Access devices. There are lot of USB settings for multiple devices, however we will configure a setting All Removable Storage classes: Deny all access.
How to disable USB drives using Group Policy
Right click on the setting All Removable Storage classes: Deny all access and click Edit. If you enable this policy then it will block access to any removable storage class that you connect to the computer. Click Enabled and click Apply and then OK.
How to disable USB drives using Group Policy
So far we have created a group policy object, the next step is to link the GPO to the OU containing the computer accounts for which the USB devices are to be blocked. Right click on the OU and click Link an Existing GPO.
How to disable USB drives using Group Policy
From the list of GPO’s select the policy Block USB Devices and click OK.
How to disable USB drives using Group Policy
Perform a group policy update on the client using the command gpupdate /force. Connect any USB device to the computer and you should see the message as Access is denied. The policy that we applied will prevent users from mounting any class of removable media.
How to disable USB drives using Group Policy

Thursday, June 5, 2014

उच्च रक्तचापबाट जोगिने १० टिप्स

उच्च रक्तचाप (बोलीचालीको भाषामा बी पी हाइ ) र तनाव पछिल्लो समयमा आम मानिसका साझा स्वास्थ्य समस्या बनिरहेका छन् । असन्तुलित खानपान, व्यस्त तथा दौडधूपपूर्ण जिवनशैली, व्यायामको अभाव, बढि नुनिलो तथा फास्टफुडको अत्यधिक सेवनले गर्दा मानिसमा उच्च रक्तचापको समस्या आउने गर्छ ।   रक्तचाप सामान्य अवस्थाभन्दा बढि अर्थात् १४०/९० भन्दा माथि निरन्तर रुपमा रहिरह्यो भने त्यसलाई उच्च रक्तचाप भएको भनिन्छ । यद्यपि उच्च रक्तचाप आफैमा रोग होइन तर यसले अन्य रोगलाई जटिल बनाउँछ । जिवनशैली तथा खानपानमा सन्तुलन ल्याउने हो भने उच्च रक्तचापबाट बच्न सकिन्छ । उच्च रक्तचापबाट बच्ने केही उपाय निम्न छन् ः

१. जगिङ - नियमित रुपमा दौडनु वा हिड्नु स्वास्थ्यका लागि फलदायक हुने विभिन्न अध्ययनले देखाएका छन् । अनुसन्धानकर्ताहरुका अनुसार हप्तामा १ घण्टासम्म मात्र पनि जगिङ गरेमा ६ वर्षले आयु बढ्छ । जगिङले बहुआयामिक स्वास्थ्य लाभ दिने शोधकर्ताहरुको दाबी छ । यसले रगतले अक्सिजन लिने दरमा वृद्धि गर्नुका साथै रक्तचाप सन्तुलन गर्न सघाउ पूराउँछ । जगिङ होस् वा अरु कुनै शारीरिक क्रियाकलाप त्यसले मुटुलाई सक्रिय तथा ससक्त बनाउने र रगत पम्प गर्ने प्रक्रियालाई सहज बनाउने हुनाले रक्तनलीहरुमा दबाब कम पर्छ । यसका कारण रक्तचाप स्वतः सन्तुलित बन्दछ ।

२. पर्याप्त मही खानुहोस् - उच्च रक्तचापका रोगीलाई महीको सेवन निकै लाभदायी हुने मात्र होइन स्वस्थ व्यक्तिले नियमित मही खाँदा यसले रक्तचाप बढि हुने जोखिम पनि घटाउँछ । अध्ययन अनुसार दिनको एक कप मही खाने हो भने उच्च रक्तचापको जोखिम एक तिहाइले घट्छ । महीमा पाइने क्याल्सियमले रक्तनलीलाई बलियो तथा लचकदार बनाउने हुँदा रक्तनलीको सहज फैलावटकाका कारण दबाब कम भई रक्तचाप नियन्त्रित हुन्छ ।

३. केरा खानुहोस्- केरामा प्रसस्त पोटासियम लवण पाइन्छ । केराजस्ता पोटासियमले भरिपूर्ण फलफूलको सेवनका साथै नूनको कम सेवनले रक्तचाप बढ्ने जोखिम घटाउँछ । पोटासियमले सरीरमा तरल पदार्थको सन्तुलनलाई कायम राख्दछ जसका कारण रक्तचाप नियन्त्रित हुन्छ । विज्ञहरुले रक्तचापलाई सन्तुलनमा राख्नका लागि दिनमा ५ वटा सम्म केरा खान सुझाव दिन्छन् ।

४. नूनको खपत घटाउनुहोस्-  नून बढि खाँदा स्वतः रक्तचाप बढ्दछ । रगतमा नून घोलिने भएकाले रक्तनलीमा रगतको मात्रा तथा चाप बढ्न जान्छ । केवल बढि चर्को तरकारी नखाने मात्र होइन नून बढि हुने विभिन्न खाले फास्टफूडको सेवन पनि कम गर्नुपर्छ ।

५.वजन नियन्त्रण गर्नुहोस्-  मोटोपन रोगको घर हो भन्ने उखानै छ । मोटोपनाले उच्च रक्तचाप लगायत विभिन्न खाले हृदयरोगको जोखिम बढाउँछ । शोधकर्ताहरुका अनुसार केही किलो मोटोपना घटाउँदा मात्र पनि रक्तचाप उल्लेखनीय मात्रामा कमी आउँछ ।

 ६.धूमपान नगर्नुहोस्-  धुम्रपान उच्च रक्तचापको मुख्य कारक तत्व हो । चुरोटमा भएको निकोटिनले सरीरका ग्रन्थीलाई उत्प्रेरित गर्छ जसका कारण एडि्रनलिन हर्मोनको उत्पादन बढ्दछ । यो हर्मोनका कारण मुटुको धड्कन तिब्र बन्दै जान्छ जसका कारण रक्तनलीमा दबाब बढ्दा रक्तचाप पनि बढ्दछ ।

 ७. काम घटाउनुहोस्-  अत्यधिक व्यस्त जिवनशैली तथा कामको धपेडी उच्च रक्तचापको एक मुख्य कारण बनेको छ । एक अध्ययन अनुसार निरन्तर हप्तामा ४० घण्टा काम गर्दा सरीरको रक्तचाप १४ प्रतिशतले बढ्दछ । ओभरटाइम काम गर्ने बानीले रक्तचाप अझै बढ्ने अध्ययनको निष्कर्ष रहेको छ । हप्तामा ४० घण्टाभन्दा कम काम गर्नेमा भन्दा ५१ घण्टा बढि काम गर्नेमा उच्च रक्तचापको जोखिम २९ प्रतिशत बढि पाइएको छ ।

८. घुर्ने बानी छ ? सचेत हुनुहोस् - यदि तपाइँमा सुतेको बेला घुर्ने बानी छ भने होसियार हुनुहोस्, तपाइँलाई उच्च रक्तचापको समस्या हुनसक्छ । त्यसैले आफ्नो रक्तचाप परीक्षण गरी सावधानीका उपाय अपनाइहाल्नुहोस् । पर्याप्त निद्रा सुत्नुहोस् ।

९. कफी कम खानुहोस्-  बढि कफी तथा कफिजन्य पदार्थ खाँदा त्यसले रक्तचाप बढाउने अनुसन्धानकर्ताहरु बताउँछन् । दैनिक ५०० मिलिग्राम -तिन कप) कफी खाँदा कालान्तरमा रक्तचाप ३ प्वाइन्टले बढ्ने शोधकर्ताहरु बताउँछन् । कफीमा हुने क्याफाइन तत्वले रक्तनलीलाई दहि्रलो बनाउने र त्यसले रक्तचाप बढाउने बताइन्छ ।

१०. गाजरको जुस- नियमित रुपमा गाजर, गान्टेमूला तथा लौकाको जुस खानु रक्तचाप सन्तुलनका लागि उपयोगी हुन्छ ।